
Baking a cake is something that everyone can do and is great for many occasions. For this particular blog and recipe, we are going to be doing it around the theme of going back to work or school. Though as a face painting company we only go to schools for summer fairs or open days. We know how important it is to have a great first day. We want to share with you our 3-layer cake recipe and how you can become the best cake decorator. This baking can even be made into a DIY school workshop or a science school workshop.
Start by baking three cake flavours. Either two vanilla and one chocolate flavoured or vice versa (two chocolate and one vanilla)
Ingredients for a back to school cake
The first ingredient you will need is 190g butter or margarine softened. Secondly, you will need 190g caster sugar. For the cake you will also need 4 small free-range eggs. Coupled with 190g self-raising flour. Lastly to flavour the cake you will need vanilla extract and chocolate powder.
Step 1
Heat the oven to 180C/160C Fan/Gas 4 and line three 18cm/7in cake tins with baking parchment.
Step 2
Cream the butter and the sugar together until pale. Use an electric hand mixer if you have one. Beat in the eggs.
Step 3
Sift over the flour and fold in using a large metal spoon. The mixture should be of a dropping consistency; if it is not, add a few drops of milk.
Step 4
Divide the mixture between three bowls. Add in a tsp of vanilla and a tablespoon of cocoa powder to the desired bowls.
Step 5
Spoon the mixtures into the ready prepped cake trays and gently spread out with a spatula. Bake for 20-25 minutes, or until an tooth-pick comes out clean. Allow the cakes to stand for 5 minutes before turning on to a wire rack to
Now for the exciting bit, the decorating!
The classic butter creams. Start of between each layer of cake doing a lovely thick layer of butter cream. Then do a crumb coat of butter cream around the whole of the cake (this will allow all the crumbs to be secured into the cake), leave this in the fridge and then after it has set do a second coat. After you can leave it plain or pipe on some swirls. A beautiful fresh look is to place a small bouquet of fresh flower on top. Just remember to give them a clean before.
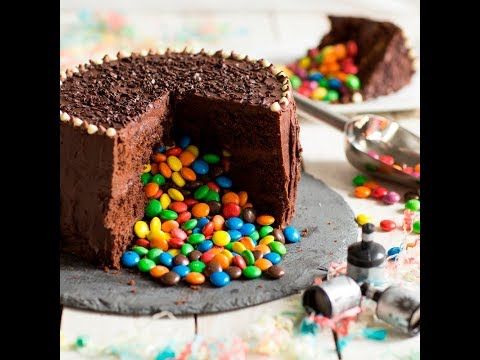
Smarties in a hole. In cake one and two cut out a whole, after stacking these two layers together using butter cream fill in the whole with smarties/skittles/chocolate coins. Then put the third cake layer on top. Cover the whole cake with icing and decorations. If you want to create a ‘pot of gold’ themed cake you can decorate with rainbow laces, edible glitter and anything sparkly. Finally, when the cake is cut into it will spill out the filling creating a magical and fun cake. Nearly as magical as our face painting designs.
The final cake decoration is making the most of chocolate and sweets. Chocolate-fingers, KitKat can be used to surround the cake. Moreover, a simple ganache which is a combination chocolate and single cream melted together creating a tasty sweet, cream top. We use our face painting skills to create chocolate art… sometimes we wish our face paints were made out of chocolate!