


How to face paint a unicorn
Face Painting Design for beginners: How do you face paint a unicorn? Unicorn is a favourite, fun, sparkly design and is chosen at every event, no matter how old the guests are. Face Painting Sheffield wants you to be able to create this iconic look at home, before your- face painting hire.
You will need for the unicorn face painting:
• Pink face paint – snazaroo
• Blue face paint – snazaroo
• Black face paint – snazaroo
• White face paint – amazon
• Three brushes (small thin brush, flat medium brush and standard brush)– snazaroo
• Spray bottle or cup of water – amazon
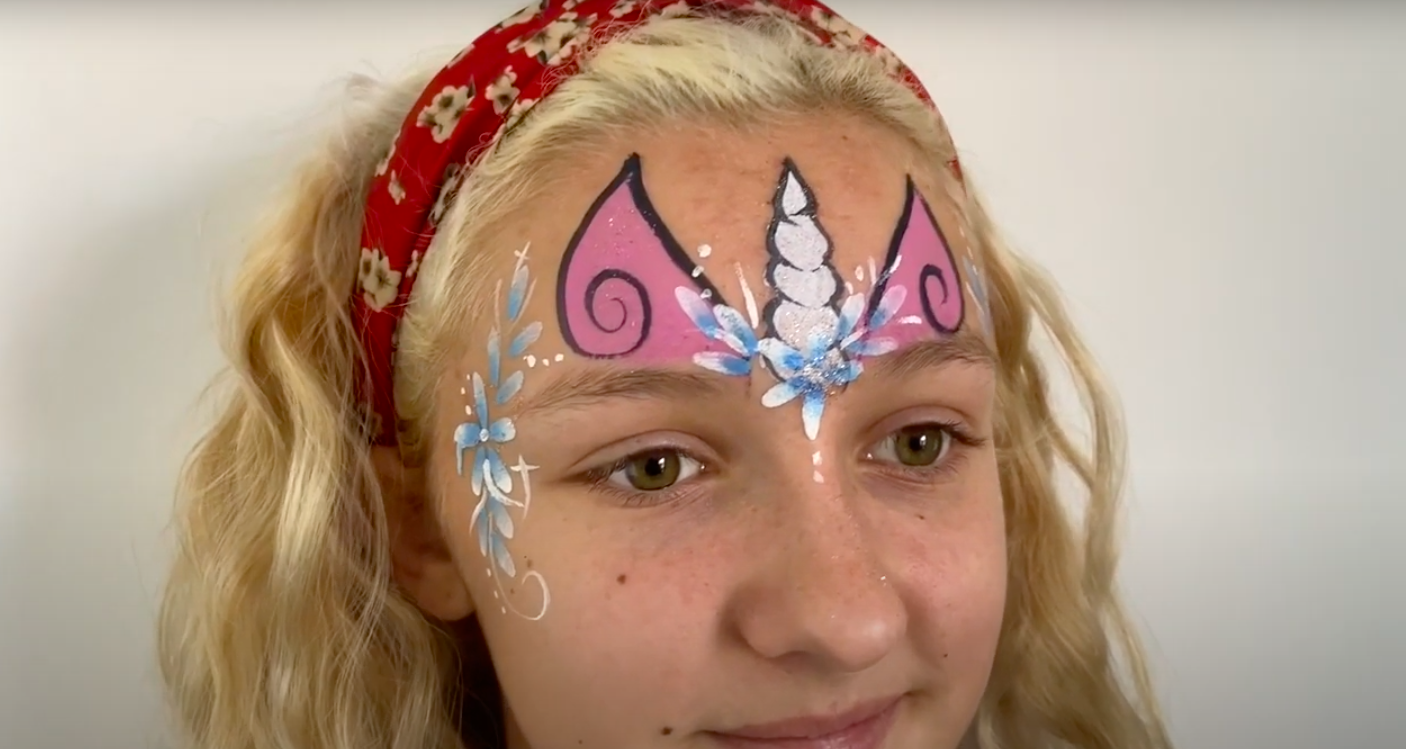
How to do a unicorn face paint:
Step 1:
Firstly, start by drawing a line down the centre. On each side draw curves creating the unicorn horn. Each swirl needs to get thicker as you get down the line. Then fill in the unicorn horn using the white paint. As we’ve said in previous ‘how-to’ posts depending on the size of the face depends on your scope of the brush. Larger face, big brush and smaller face, tin brush.
Step 2:
Secondly, using the pink, draw on a triangle on either side of the horn. Therefore, curving the outer line. Moreover, fill in with pink paint. Creating unicorn’s ears.
TIP: Don’t rush putting makeup on your brush. Keep adding small sprays/drops of water to build up the correct consistency.
Step 3:
Thirdly, using a thin brush and black paint outline the unicorn horn. Thus, I use a loose style which makes it a lot easier to do. Also, outline the ears, on the outer side of the ear a swirl to create a magical, unicorn look.
Step 4:
How to paint a flower: Start by coating the brush in white and then dip the tip in another colour. Moreover, to correctly create the flowers. Slowly put the tip down and layer on the brush. Move the brush to create an even distribution of the flower petals.
Step 5:
Fifthly, after you’ve practised a couple of times drawing the flower on your hand. Start creating your masterpiece. It is best for a big flower in the centre which smoothens the edge.
Step 6:
The last step, using a thin white brush fill in gaps with dots and add swirls, judge how much swirls and dots you need. Take the big swirls slowly, as the neater they are, the bigger of an impact they have.
Step 7 (optional):
Finally, as an optional step glitter can be added to the whole designs and gems.
For visual and more information, you can watch our youtube video. https://www.youtube.com/watch?v=eY0-bKmUp58
Our other services include:
Balloon Modelling
Candy Floss Hire
Package Deals
[btn_dont_miss_out class=””]